I have a confession to make: prior to working at Devolutions, I wasn’t as cautious as I am today with password security. Don’t get me wrong. It’s not like I did unforgivable things like choose “123456” or “QWERTY” as my passwords. I’ve always been a techie, and so I selected long, complex passwords and changed them pretty often (which by the way is a practice that the National Institute of Standards and Technology/NIST is now advising against — we’ll be blogging on that soon!)
But once I started working here as an intern, I was shocked to see how much more I needed to do. So, I started using Remote Desktop Manager as my password management platform, and I’ve found it easy and fast to create entries, scan passwords and generate new passwords. Over the years, I’ve also added some more layers of security and protection, such as high-end encryption and 2-factor authentication.
Recently, I decided to switch my password management platform from Remote Desktop Manager to Devolutions Password Server. I had been thinking of doing this for a while, because logging in via the Office 365 Authentification is easy and convenient. And then the arrival of Devolutions Launcher sealed the deal for me, since it allows me to connect to remote machines and accounts without having to open Remote Desktop Manager (by the way, we released Devolutions Launcher 1.1 last week).
If you’re thinking of joining me on the journey from Remote Desktop Manager to Devolutions Password Server, you might be wondering how to transfer all of your entries. Well my friends, let me tell you that it’s very simple! Here is what to do:
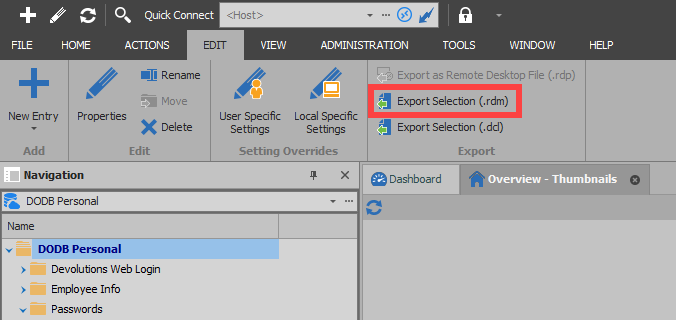
Start by going to the Edit tab, and click on Export Selection (.rdm)

In the Remote Desktop Manager Export Entries Window
Once you click on export selection, you can also include your credentials in .rdm export format, and secure your files with a master key. Keep in mind that by default, the credentials are NOT included.
Important note : Specifying a master key will encrypt the entire .rdm file. Make sure you keep this password safe and secure!

Importing Entries in Devolutions Password Server
- Head to your company’s DPS account (ex: https://servername/dpsprod).
- Log in
- Select the vault (Shared or Private) you want to add your entries to.
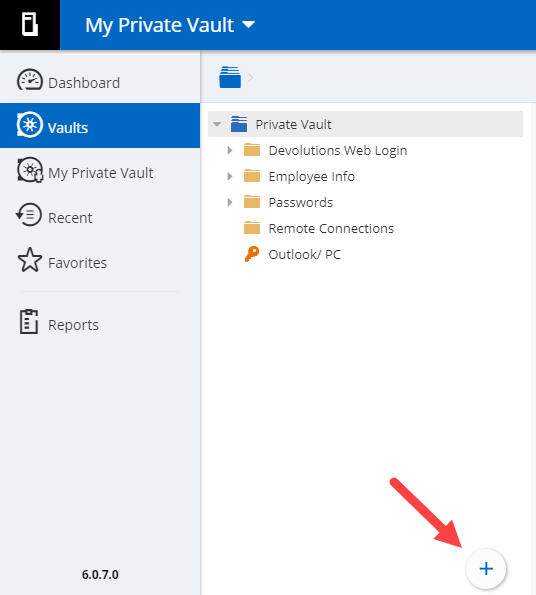
- Once in your vault, click on the “+” button, and then click on import to open the “import entries” window.

In the “Import Entries” Menu
- Choose the .rdm file that you previously exported.
- Choose the folder that you want to import into.
- Add the Master Key (remember the one you just stored safely and securely?).

- Click Next
- Choose the entries you want to add or simply select “Add” and then “Apply All”.

Important Note : Before you click on next again, make sure to review all the entries you wanted to add. Once done, click “NEXT” once and ONLY once! Why is this so important? Because the process can take a little while if you’re importing many entries. If you click “NEXT” more than once, then you might end up with duplicate entries. You don’t want that.

And That’s It!
Once the process is over, all of your entries will be stored in Devolutions Password Server. If you wish, you can also switch your Web Login Preference from RDM to DPS. For steps on how to do this, check out Jenny’s tutorial here.


