
Pop quiz: What are the three common methods of port redirection with SSH?
If your answers are local port forwarding, remote port forwarding and dynamic port forwarding, then…*ding ding ding* You’re right! Take a bow and bask in the glory of your Sheldon-like brain.
Local port forwarding, which is the most common option, is used to create a secure connection between a local computer and a remote machine, through which services can be relayed. For example, local port forwarding can be used to bypass a company firewall that would block access to Reddit (how dare they?).
Remote port forwarding is a bit less common. It lets you connect your SSH server to a computer on your company's intranet, which is useful for granting someone on the outside access to an internal web server.
Dynamic port forwarding, which we’ll take a closer look at today, is one of the most powerful port forwarding methods, since it lets you bypass a company firewall that would otherwise completely block access to the web. Unlike local and remote port forwarding that only allow interaction with a single port, dynamic port forwarding enables a full range of TCP communication across a range of ports.
You can set up a dynamic port with Putty or with RDM. The added benefit of using RDM is that you can then use your dynamic port to connect with different types of sessions such as SSH, web and RDP.
Here are the steps for setting up dynamic port forwarding in RDM.
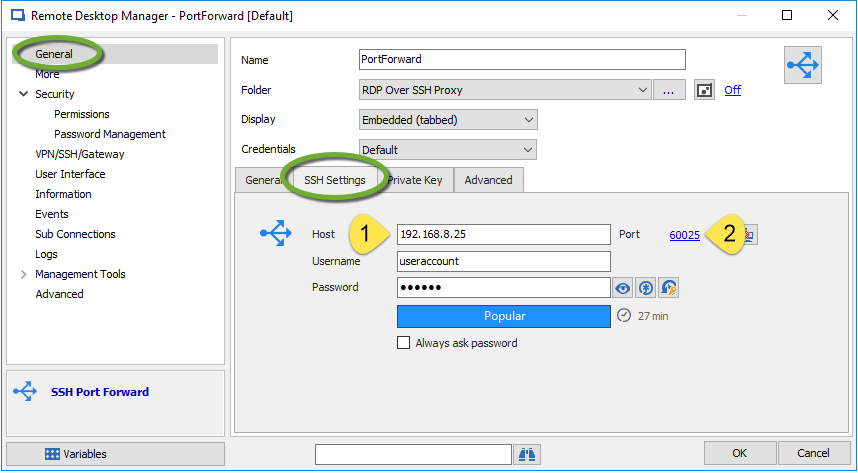
Step 1
Create a new SSH Port Forward entry in RDM by clicking Generalon the side menu, and then entering your SSH information in the SSH Settingstab. You will need to enter the IP address of the SSH Gateway Server, and the port number of the SSH Gateway Server.
Step 2
In the Generaltab, click on the Plusto create the dynamic link that will be used for every proxy tunnel. The source is **127.0.0.1 **and the mode is Dynamic. Remember that the source port must be the same as the one configured in each proxy tunnel entry.
Here is the PowerShell script you’ll need to enter to create this entry:
# Create the SSH Port Forward entry type with Dynamic port $sshPortForward = New-RDMSession -Name "PortForward" -Type PortForward -Group "RDP Over SSH Proxy" $sshPortForward.Terminal.Host = "192.168.8.25" $sshPortForward.Terminal.HostPort = "60025" $sshPortForward.Terminal.Username = "useraccount" $sshPortForward.Terminal.PrivateKeyPromptForPassPhrase = $false $sshPortForward.Terminal.TCPKeepaliveInterval = 1 $sshPortForward.Terminal.Verbose = $true $sshPortForward.Terminal.VerbosityLevelMac = 2 $newPortForward = New-Object Devolutions.RemoteDesktopManager.Business.PortForward $newPortForward.Mode = "Dynamic" $newPortForward.Source = "127.0.0.1" $newPortForward.SourcePort = 60000 $sshPortForward.Terminal.PortForwards = $newPortForward Set-RDMSession $sshPortForward -Refresh $pwdSSHPF = ConvertTo-SecureString "123456" -AsPlainText -Force Set-RDMSessionPassword -Session $sshPortForward -Password $pwdSSHPF Set-RDMSession $sshPortForward -Refresh
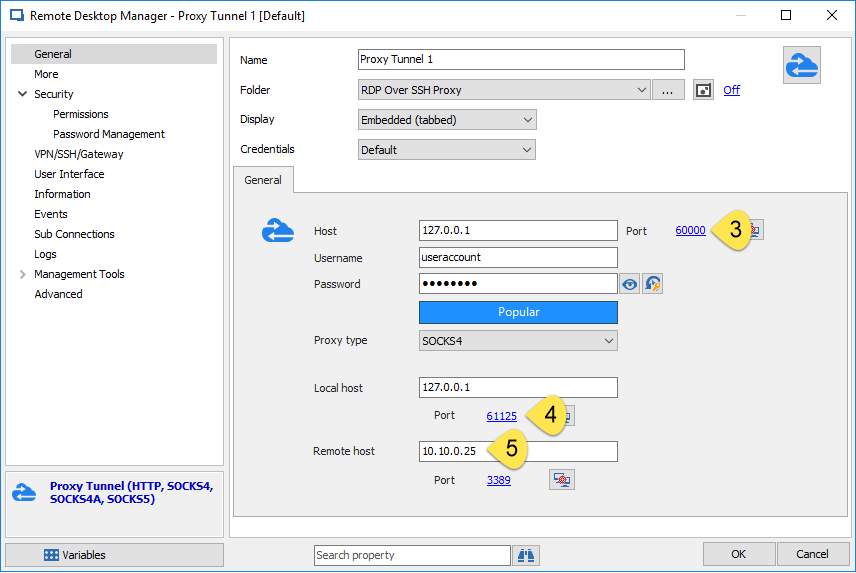
Step 3
Create a proxy tunnel entry for each RDP entry, and bind the RDP entry to the proxy tunnel using the VPN settings. Enter the same port number as the SSH port forward entry, and then enter the port number used by the RDP entry. This port number should be unique for every Proxy Tunnel/RDP entry group. Then enter the IP address of the RDP machine.
Step 4
In the Generalside menu, click on the Generaltab and enter the port number that you configured in the proxy tunnel (per step 3).
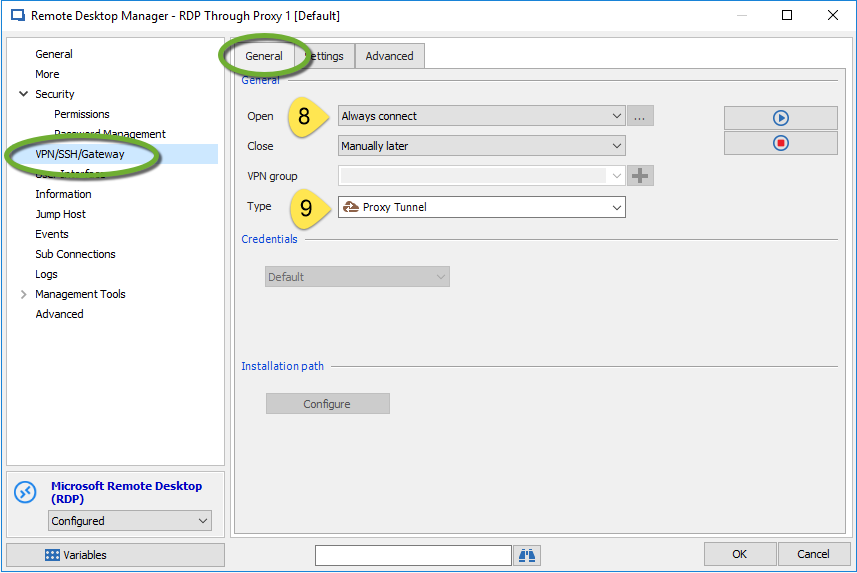
Step 5
In the VPN/SSH/Gatewayside menu, click on the Generaltab and set the following properties: set the VPN Openparameter to Always connect, and set the Typeparameter to Proxy Tunnel.
Step 6
Click on the Settingstab of the VPN/SSH/Gatewayside menu. In the Sessionparameter select the proxy tunnel.
Step 7
Enter the PowerShell code to create the Proxy Tunnel/RDP duo entries. You’ll need to put this in a loop in order to create them from your CSV file that contains all of your RDP entries.
# For each RDP entry, you need to create a Proxy Tunnel and a RDP entry bind to that Proxy Tunnel entry # Create the Proxy Tunnel entry type $proxyTunnel = New-RDMSession -Name "Proxy Tunnel" -Type ProxyTunnel -Group "RDP Over SSH Proxy" $proxyTunnel.ProxyTunnel.Host = "10.10.0.25" $proxyTunnel.ProxyTunnel.LocalHost = "127.0.0.1" $proxyTunnel.ProxyTunnel.LocalPort = "61125" $proxyTunnel.ProxyTunnel.Port = "3389" $proxyTunnel.ProxyTunnel.ProxyHost = "127.0.0.1" $proxyTunnel.ProxyTunnel.ProxyPort = "60000" $proxyTunnel.ProxyTunnel.ProxyType = "Socks4" $proxyTunnel.ProxyTunnel.Username = "useraccount" Set-RDMSession $proxyTunnel -Refresh $pwdProxy = ConvertTo-SecureString "123456" -AsPlainText -Force Set-RDMSessionPassword -Session $proxyTunnel -Password $pwdProxy Set-RDMSession $proxyTunnel -Refresh # Create the RDP entry bind to the Proxy Tunnel $rdp = New-RDMSession -Name "RDP Through Proxy" -Type RDPConfigured -Group "RDP Over SSH Proxy" $rdp.RDP.NetworkLevelAuthentication = $true $rdp.RDP.Username = "useraccount" $rdp.VPN.Enabled = $true $rdp.VPN.Application = "ExistingProxyTunnel" $rdp.VPN.AutoClose = $false $rdp.VPN.CloseMode = "Manually" $rdp.VPN.ExistingSessionID = $proxyTunnel.ID $rdp.VPN.Mode = "AlwaysConnect" $rdp.Host = "127.0.0.1" $rdp.HostPort = "61125" Set-RDMSession $rdp -Refresh $pwdRdp = ConvertTo-SecureString "123456" -AsPlainText -Force Set-RDMSessionPassword -Session $rdp -Password $pwdRdp Set-RDMSession $rdp -Refresh
Important Note
In order for all of this to work, you’ll need to open the SSH Port Forward entry and then open the RDP entry. I strongly recommend configuring this set of entries in a test environment before running the whole PowerShell script. It’s always better to be safe than sorry!
Save Time and Headaches!
I know there are more steps involved here than many other configuration options in RDM, but spending a few minutes to set up dynamic port forwarding will save you lots of time in the future — and help you avoid some headaches as well!
Please comment below or get in touch with me directly if you have any questions or run into any challenges. Our team will jump on it faster than you can say BA-ZING-A!