We all need to keep up-to-date with everything nowadays! If you’re old enough, you’ll know the old saying “Keeping up with the Joneses” – and no I don’t mean Keeping up with the Kardashians. It means keeping up with the times, and keeping up with the wild pace of technology is never easy! (Hello iPhone 6, 6s, SE, 7, 8, 10, X, XR, XS – and all of that in the last 5 years?!?)
It’s hard to believe that it has been three years since I last wrote about using 2FA with Devolutions Server. Time really flies! So I thought it was time for an update.
What is 2FA?
For those of you who don’t work in IT security, 2FA (two-factor authentication) is an extra layer of security that requires users to enter their login credentials plus another piece of information. This extra information can be:
- Something you know, such as the answer to a secret question, a PIN or a password.
- Something you have, such as a smartphone, a token or a credit card.
- Something you are, such as your fingerprint, voice recognition or an eye scan.
How to Configure 2FA in Devolutions Server
2FA is available for Devolutions Server Team, Enterprise and Platinum. For extra security, only an administrator can configure 2FA. Here is how to set everything up:
-
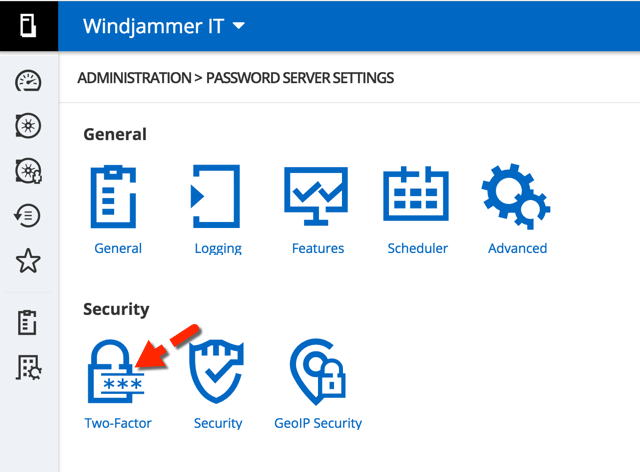
From the Devolutions Server web interface, go to Administration – Password Server Settings – Two-Factor.
-
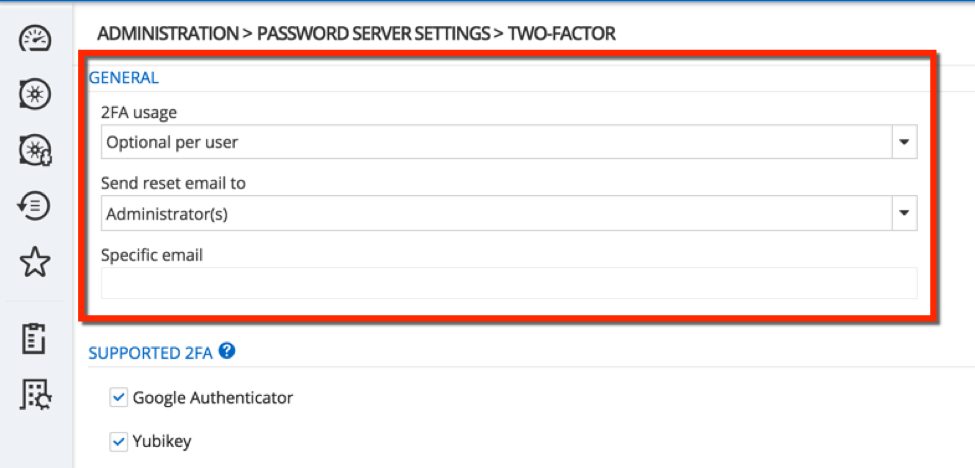
In the General section, choose your preferred options related to 2FA Usage and Send Reset Email. 2FA usage identifies who in the organization must use 2FA. The options are:
- None : No 2FA will be required for your users.
- Optional per user : Gives the administrator granular control over which users require 2FA validation and what type of 2FA each user will use. This is the most flexible option.
- Required : Makes it mandatory for everyone in the organization to use 2FA, and they must also use the same type of 2FA.
“Send reset email to” identifies who will receive an email if a user gets locked out of their account and needs to reset their password and 2FA validation. The options are: - Administrator: Sends the reset email to all users who have the Administrator check-box checked. Note: if you are using AD integration exclusively, I do not recommend using this option.
- Specific email : Sends the reset email to the specific email address that is entered in the Specific email box.
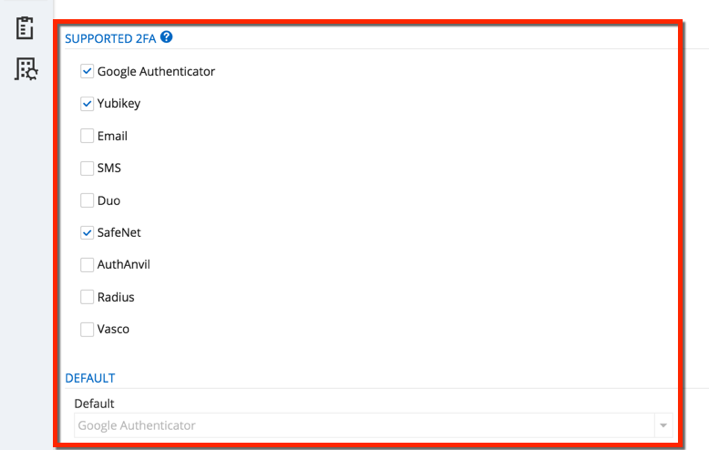
- Next, you’ll need to define the Supported 2FA types.
If you’ve selected Optional per user in your 2FA usage, you’ll need to check all types of 2FA that will be used by your users.
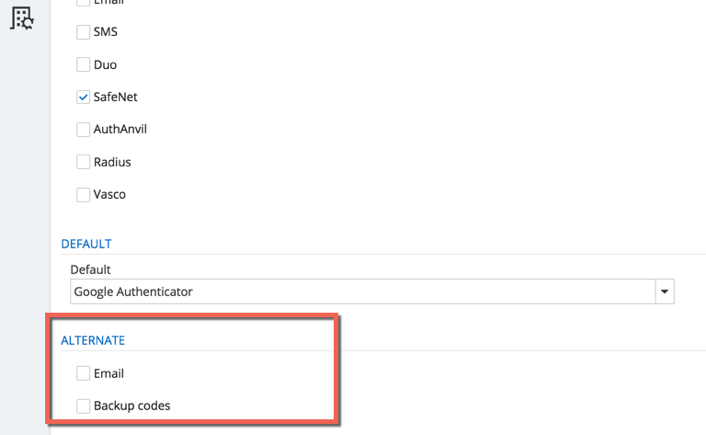
If you’ve selected Required in your 2FA usage, then check the one 2FA type that will be used by all users. If more than one 2FA type has been checked, you’ll need to select the Default 2FA in the dropdown menu.
- The Alternate section is the backdoor entry for your 2FA.
For example, let’s say you have selected SMS as one of your 2FA methods (or possibly your only 2FA method). A user forgets their phone at home and can’t log into their account. This option lets you grant them access through an email and/or through backup codes.
- Now that you’ve completed the setup, you need to define the 2FA usage for each of your users.
This step is necessary only if you’ve chosen Optional per user in your 2FA usage. For most methods, if you set 2FA to Required users will automatically be forced to set up the 2FA on their next log on.
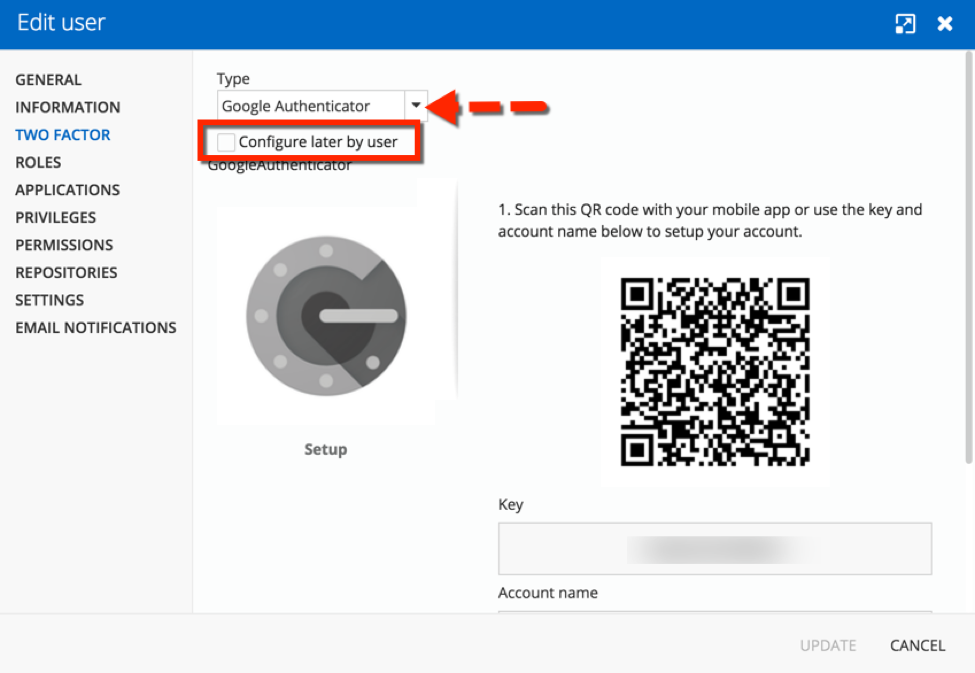
Go to Administration – Users. From there, click on the 2FA side menu. Then click the Type dropdown menu and select the 2FA type that the user will be required to use.
You can then decide to configure the 2FA for each of your users or you can simply check the Configure later by user box, in which case the next time a user logs in, they’ll automatically be prompted to configure their 2FA.
And that’s it! You can pat yourself on the back and take a bow, because you’ve enhanced your data source security in DVLS. Good job!
Bonus Round
Here’s a little extra tip: if you’ve received a notification to reset a user’s 2FA, simply go to Administration – Users 2FA Reset Status and click on the lock to reset their status.

Need 2FA Advice?
If you need some insight into choosing the right 2FA security key for your needs, check out my review and comparison of leading providers (now updated to include FreeOTP, Authenticator Plus and SoundLogin!).
Questions?
If you need any additional help configuring 2FA with Devolutions Server, please watch the tutorial video below, which should answer all of your questions. If not, then please contact us and we’ll be happy to help.
As always, please let us know your thoughts by using the comment feature of the blog. You can also visit our forums to get help and submit feature requests, you can find them here.

