The start of a new year means that it’s also the season for New Year’s Resolutions! My pledge this year is to eat healthier and go to the gym, so that I can fit into those jeans I bought two years ago thinking they would fit me…eventually!
Actually, I have another resolution that is much easier to keep, and it doesn’t involve going to battle with my scale. I would like to improve security across all of my accounts. Thankfully, 2FA is here to help me with this important task.
2FA (two-factor authentication) is an extra layer of security that requires you to verify your identity by providing your username and password, as well as another piece of information. This extra information can be:
- Something you know, such as the answer to a secret question, a PIN or a password.
- Something you have, such as a smartphone, a token or a credit card.
- Something you are, such as your fingerprint, voice recognition, or an eye scan.
The basic idea is that even if your login credentials are stolen, it’s highly unlikely (but still technically possible) for hackers to provide the additional information.
How to Configure 2FA in Remote Desktop Manager
Remote Desktop Manager features 2FA support for the following data sources: SQLite, MariaDB, SQL Azure, SQL Server and MySQL. You can easily implement 2FA to any of these data sources using the following security keys: Google Authenticator, Yubikey, Duo and AuthAnvil. Here is what to do:
- When creating your data source, click None next to ‘Two factor’.

-
Click Change to modify your 2FA authentication option.
-
From the drop-down menu, select the 2FA security key that you wish to use.
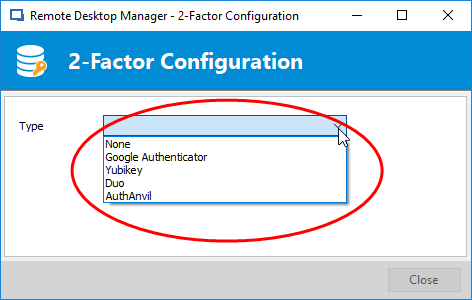
- Click on Save. Saving your 2FA will bring you to the appropriated configuration window according to the type of 2FA selected. If you need additional support setting up your desired 2FA security key, then online help is available for Google Authenticator, Yubikey, Duo or AuthAnvil.
And that’s it! You can pat yourself on the back for strengthening your security and making it less likely that you will get attacked by hackers.
If you’re wondering why I haven’t mentioned Devolutions Password Server in this blog, it’s simply because the how-to and the 2FA’s authentication type supported are different from the ones with Remote Desktop Manager. Stay tune for my blog on How to Confiture 2FA in DPS coming soon!
Also, if you need advice on choosing the right 2FA security key for your needs, check out my review and comparison of leading providers (updated to include FreeOTP, Authenticator Plus and SoundLogin!).
Now, if only RDM could help with my $@&%#! jeans…
As always, please let us know your thoughts by using the comment feature of the blog. You can also visit our forums to get help and submit feature requests, you can find them here.
To learn more on how to configure your 2FA with Remote Desktop Manager please see our tutorial video below.