Ah yes, once again it’s time to get back to basics! A little while ago, I discussed how Remote Desktop Manager sometimes needs a database upgrade to ensure new features are properly added
Today, I want to dig a little bit deeper — while still keeping things nice and simple — by looking at the steps involved in a database upgrade. [Please note that the following applies to installations that are using a database as their data source.]
Step 1: Login with Admin Rights
Start by logging into Remote Desktop Manager. You must have administrative rights, and you must also be the SYSDBAor DB_OWNER, for those of you already following our best practices, that would be the RDMOWNERaccount. This is a security feature that ensures only authorized users can perform a database upgrade.
Step 2: Connect as the Sole User
During the upgrade process you need to be the sole user of the database. If members of your team need to access the database, simply ask them to **temporarily ** **work in offline mode. **If you’re using DVLS, there’s already a handy “TAKE OFFLINE” command to help you out with that!
Step 3: Backup your Database
I can’t emphasize this enough: before upgrading, always, always and always backup your database! It’s always better to be safe than sorry.
Step 4: Install the Latest Version (if Necessary)
If you don’t have the latest version of Remote Desktop Manager, you’ll need to download and install it. You can check by going to Help– Check for Updatesand then clicking OK. Or if you prefer, you can go to the download page and get the latest version. If you’re using a personal workstation, you may want to use the Portable (USB) deployment model.
Step 5: Upgrade the Database
Once you’ve installed (if necessary) the latest version of Remote Desktop Manager, there are two ways to upgrade the database: automatic and manual.
**Automatic: **When you access your data source, you’ll be prompted with an upgrade message. Simply authorize the upgrade.
**Manual: **If you wish to do things manually, follow these steps:
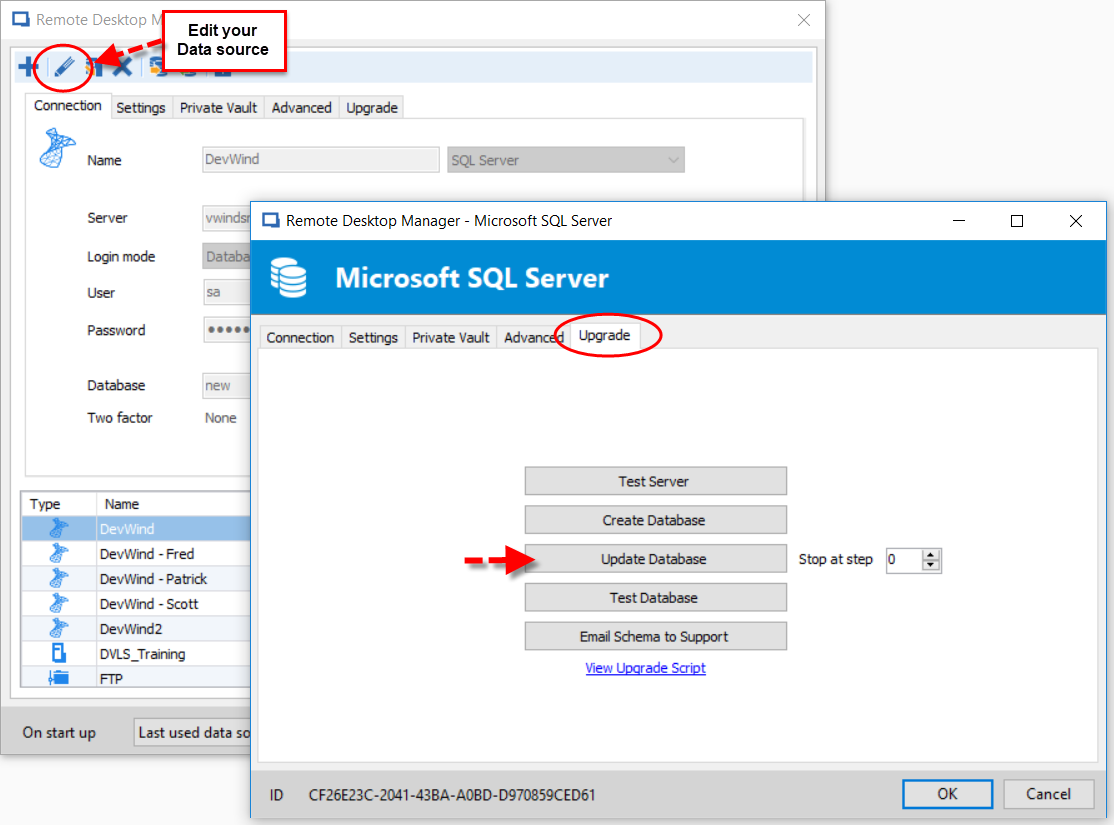
- Go to File – Data sourcesand locate your data source
- Click Edit your Data Source
- In the Upgradetab, click on Update Database.
Step 6: Force Refresh
Once the database upgrade is complete, you’ll receive a success message (nice going!). Ensure that Remote Desktop Manager is using the data source that was just upgraded, and then **click Ctrl+F5 **to force a full refresh.
Step 7: Verify your Data
Take a few minutes to scan your database and verify that everything looks good and is working properly.
Step 8: Upgrade Workstations
Once you’ve verified that the upgrade went flawlessly, update the client software on all workstations.
And that’s it!
Follow these 8 steps (especially #3!), and you’ll be a pro at upgrading the database whenever it’s necessary, and this will help you and all of your colleagues enjoy the latest Remote Desktop Manager features, functions and fixes.
If you have any comments or questions, or would like to share your database upgrade experience, please comment below or email me directly.
As always, please let us know your thoughts by using the comment feature of the blog. You can also visit our forums to get help and submit feature requests, you can find them here.