A few weeks ago we took a look at how to secure Open SSH in 10 steps, and one of those steps was how to secure SSH using Two-Factor Authentication. Well, since it is quite complex to set up, we’ve decided to dedicate a whole blog to that particular step!
As you all know, there are multiple types of Two-Factor Authentication device, but Google offers the required software to integrate Google Authenticator’s time-based, one-time password (TOTP) system with your SSH server. Securing SSH with 2-Factor Authentication (2FA) allows you to add an extra layer of security by verifying the user identity with something they know (username and password) and something they have (their mobile phone or the Google Authenticator application).
Google Authenticator has also released a Pluggable Authentication Module (PAM), with packages available on Debian/Ubuntu. If your Linux distribution doesn’t contain a package for this, you can download one from the Google Authenticator downloads page and compile it yourself.
A little warning before we start: if you activate Google Authenticator for a user but not for root, you won’t be able to connect with the root user directly anymore. Instead, you’ll have to login as the new user first, and then switch to the super user using the su command to access the root. What you need to follow this tutorial:
- Ubuntu 16.04.2 LTS server with a sudo non-root user, SSH key, and firewall enabled.
- A smartphone or tablet with the Google Authenticator app installed (iOS, Android).
Ready? So let’s get started!
Step 1 – Install Dependencies
To install the package, you’ll need to have root or sudo privileges on the machine you wish to secure your SSH with 2FA using Google Authenticator.
First, update your Ubuntu’s repository cache with the following command:
sudo apt-get update
Next, run the following command to install the required dependency package for Ubuntu:
sudo apt-get install libpam-google-authenticator

This will install the PAM module on your machine and will also install libqrencode3, which allows you to use your camera’s phone to scan the qr-code directly from the console.
Using the PAM, you will now be able to generate TOTP keys for each user who will be using 2FA. Each key is generated on a user-by-user basis rather than a system-wide basis. As such, every user will need to log in and run the app to get their own key.
To run the initialization app, log in as the user you’ll be logging in with remotely and enter the following command:
google-authenticator
Allow the command to update your Google Authenticator. After running the command, you’ll be asked a couple of questions, the first one being:
Do you want authentication tokens to be time-based (y/n)

PAM allows for time-based or sequential-based tokens, meaning the code starts at a certain point and then increments the code after every use. The code will change randomly after a certain time lapse, and since the Google Authenticator apps are designed for this, we suggest answering ‘yes’ (y) to this question.
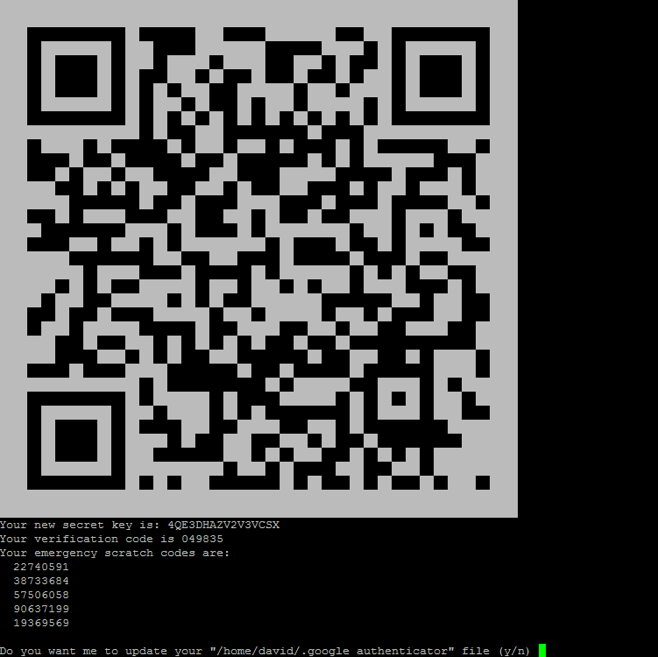
You’ll then be presented with a secret key and multiple “scratch codes”. We strongly suggest saving these emergency scratch codes in a safe place, like a password manager. These codes are the only way to regain access if you lose your phone or lose access to your TOTP app, and each one can only be used once, so they really are in case of emergency.
You’ll then be prompted with several questions used to direct the PAM’s functioning. These choices are all about balancing security with ease-of-use. Let’s take a close look at each question:
Do you want me to update your "~/.google_authenticator" file (y/n)
This will write the key and options to the .google_authenticator file. If you say no, the program quits and nothing is written, which means the authenticator won’t work. Unless you have a good reason not to, enter ‘yes’ (y) to this question.
Do you want to disallow multiple uses of the same authentication
token? This restricts you to one login about every 30s, but it
increases your chances to notice or even prevent
man-in-the-middle attacks (y/n)
This part is a time-based login. We suggest answering ‘yes’ **(y) **here since this will prevent a replay attack, allowing you 30 seconds from the point of getting the code on your mobile to typing in your login prompt, and then disallowing reuse of the same code immediately after. This will prevent a hacker attack from getting a code you have just used, thereby preventing the hacker from trying to log in.
By default, tokens are good for 30 seconds and in order to
compensate for possible time-skew between the client and the server,
we allow an extra token before and after the current time. If you
experience problems with poor time synchronization, you can increase
the window from its default size of 1:30min to about 4min.
Do you want to do so (y/n)
For security reason we strongly suggest answering ‘no’ (n) here in order to maintain a limit of 3 valid codes in a 1:30-minute rolling window. Answering ‘yes’ would allow up to 8 valid codes in a 4:00-minute rolling window.
If the computer that you are logging into isn't hardened against
brute-force login attempts, you can enable rate-limiting for the
authentication module. By default, this limits attackers to no more
than 3 login attempts every 30s.
Do you want to enable rate-limiting (y/n)
We suggest answering ‘yes’ (y) since rate-limiting means that a remote attacker can only attempt a certain number of guesses before being blocked. Rate-limiting is a great hardening technique to use.
That concludes the initial setup for the Google Authenticator PAM module. The next step is it to tell SSH about the PAM module and configure SSH to use it.
Step 2 – Configuring OpenSSH
To avoid locking yourself out of your server if a problem or a mistake occurs in your SSH configuration, it’s essential never to close your initial SSH connection. Simply open another SSH session to proceed with testing. Once you have verified that everything works properly, you can then close your session safely.
To begin, open your PAM configuration file:
sudo vi /etc/pam.d/sshd
Then add the following line to the file:
auth required pam_google_authenticator.so

Save the changes and close the file. Then, you’ll need to configure SSH to support the authentication method. Open the SSH configuration file:
sudo vi /etc/ssh/sshd_config
Locate the ChallengeResponseAuthentication line, and change its value to ‘yes’.
# Change to yes to enable challenge-response passwords
(beware issues with # some PAM modules and threads)
ChallengeResponseAuthentication yes

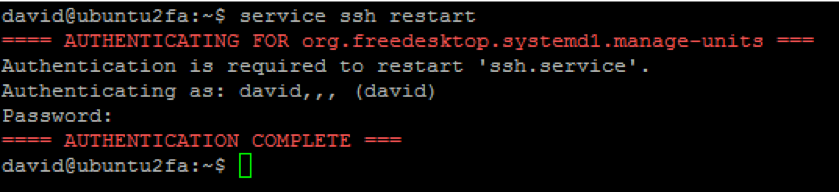
Save the changes and close the file. Then you’ll need to restart your SSH server for the changes to take effect.
service ssh restart
Step 3 - Setup the Google Authenticator App
It’s now time to setup the app on your SmartPhone. Install the Google Authenticator and open it up. From the main screen, tap Settings and Set up account. In the new window, tap Enter provided key. Then, in the Manual account entry screen, enter the secret key that was provided to you in Step 1, give the entry a name, select Time based from the drop-down and tap Add. It will then generate a one-time verification code (pin number) that will change every 30 seconds.
Step 4 – Login to Your Computer via SSH
Test everything by opening another terminal and try logging in over SSH. First you’ll be prompted for your user password. Once the password authenticates, you’ll be asked for the Google Authenticator verification code.

Your OpenSSH now has an extra layer of security! I would say that it’s quick and easy to do, but for once I won’t – these steps can take time, especially if you have multiple users to account for. But trust me, it’ll be worth the hassle knowing you’ll be able to sleep like baby with servers that are safe and secure!
As always, please let us know your thoughts by using the comment feature of the blog. You can also visit our forums to get help and submit feature requests, you can find them here.