
We often receive questions about our SSH Tunnel entry. What does it do exactly? When do you need it? What does it eat in winter? How do you actually set it up? Let’s take a deeper look at it!
SSH tunneling is used to create a secure connection between a local and a remote computer, by going through another device that relays a specific service. Some people call this device a Jump or server. It’s basically an encrypted tunnel created through an SSH protocol connection. The SSH Tunnel can be used to establish a form of a virtual private network (VPN), and since the connection is encrypted, it can be useful for transferring unencrypted traffic over a network through an encrypted channel.
For example, we can use an SSH Tunnel to securely transfer files between a FTP server and a client even though the FTP protocol itself is not encrypted. It could also be useful when connecting a client through an SSH server protected by a firewall. SSH tunnels also provide a means to bypass firewalls that prohibit or filter certain internet services. There are three ways to create an SSH tunnel: Local port forwarding: The connections from the SSH client are forwarded via the SSH server, then to a destination server. Local port forwarding lets you connect from your local computer to another server. For example, you could use the local port forwarding to bypass a company firewall to connect to your client. It is the most used type of port forwarding.
Remote port forwarding: The connections from the SSH server are forwarded via the SSH client, then to a destination server. Remote port forwarding lets you connect from the remote SSH server to another server. For example, you could connect from your SSH server to a computer on your company's intranet. It is a less common type of port forwarding.
Dynamic port forwarding: The connections from various programs are forwarded via the SSH client, then via the SSH server, and finally to several destination servers. Each program that uses the proxy server needs to be configured specifically, and reconfigured when you stop using the proxy server. For example, dynamic port forwarding lets you bypass a company firewall that blocks web access altogether. It is rarely used as it is very time consuming to set up. Settings We will showcase the local port forwarding mode as it is the most commonly used by far.
To create an SSH tunnel, a given port of your local machine needs to be forwarded to a port on a remote machine, which will be the other end of the tunnel. This is the job of the SSH Server. Once the SSH tunnel has been established, the user simply connects to the local end of the tunnel in order to access the remote host transparently.
This might sound more complicated than it is — so let’s look at a concrete example of how to set up an SSH Tunnel. Let’s say you’re the IT technician at your office and need to connect to a client through an SSH server to perform work using RDP, but (there is always a but) it is protected by a company firewall. You need to get through the firewall in order to perform your work. The solution is to create an SSH Tunnel in Remote Desktop Manager to carry the RDP communication.
SSH Tunnel Diagram

Start by creating an SSH Tunnel entry in Remote Desktop Manager.
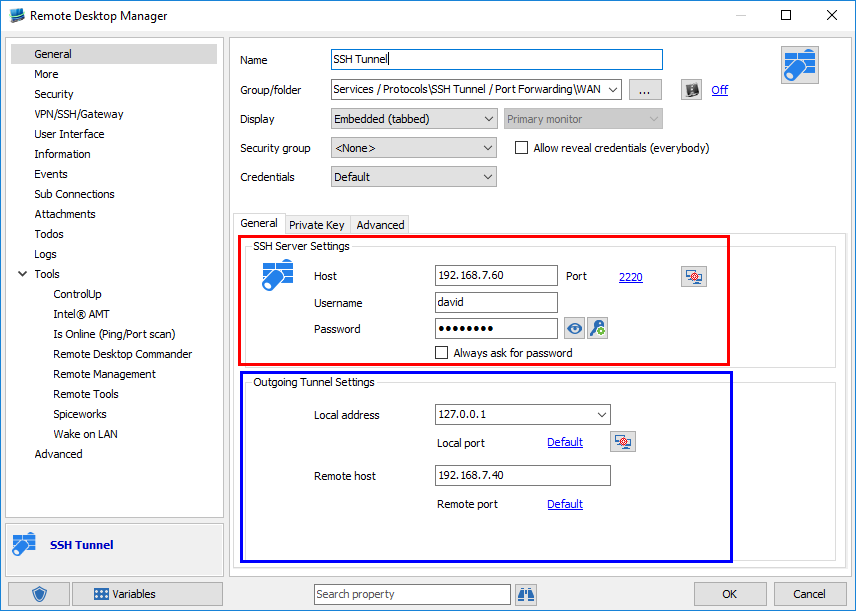
In the SSH Server Settings, enter the following information:
Host: Enter your SSH Server host or IP address (please refer to (3) in the SSH Tunnel diagram).Port: Enter your SSH Server port (please refer to (4) in the SSH Tunnel diagram). Username: Enter your SSH Server username to connect. Password: Enter your SSH Server password to connect.
In the Outgoing Tunnel Settings, enter the following information:
Local address: 127.0.0.1*(please refer to (1)* in the SSH Tunnel diagram). Local port: Use any unused port that you prefer, but RFC6335 states that the Private Port range is from 49152 to 65535 (please refer to (2) in the SSH Tunnel diagram). Remote host: Enter the host or IP address of your remote host (please refer to (5) in the SSH Tunnel diagram). Remote port: Specify the appropriate port for the chosen protocol. For instance, RDP’s default port is 3389 (please refer to (6)in the SSH Tunnel diagram).

Then create your remote session (in this example we will use an RDP session).
In your RDP session, enter the following information:
Computer: Enter your Local Address (please refer to (1) in the SSH Tunnel diagram)– 127.0.0.1 Port: Enter your Local Port (please refer to (2) in the SSH Tunnel diagram) – 49152 Username: Enter the username to connect to your Remote Host. Password: Enter the password to connect to your Remote Host.
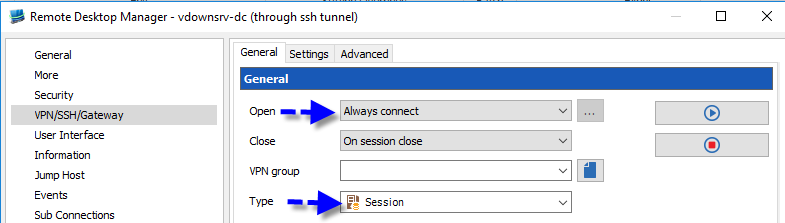
In the VPN tab of your session, in Open, select Always connect; in Type, select Session.
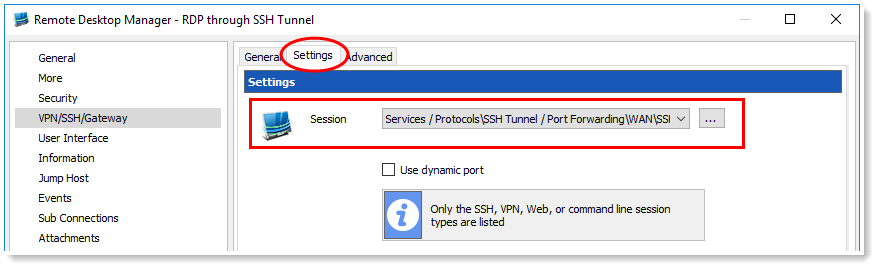
And finally, in the Settings tab of your VPN, simply select your newly created SSH Port entry.
You have now configured your session with the following rule: for each connection that comes on interface 127.0.0.1 and port 49152, forward that connection to the SSH server and request the server to forward that connection to your Remote Host.
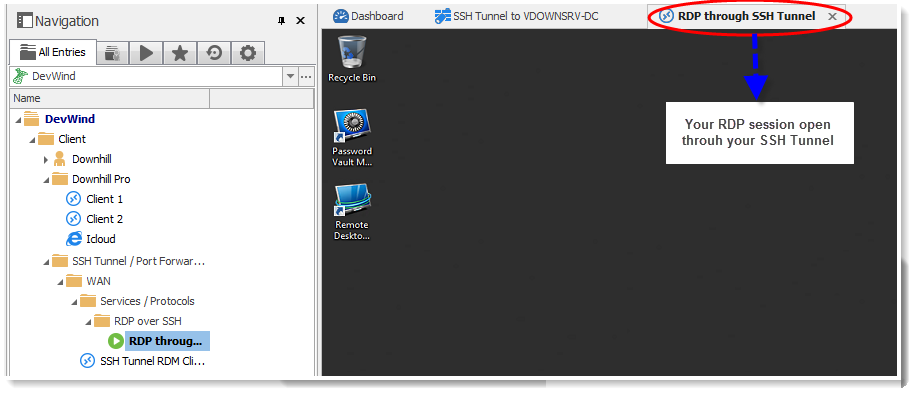
You can now launch your RDP session and your SSH Tunnel will automatically open, establish the connection, and then launch and open your RDP session.
One little side note: if you experience an error when launching your RDP session, adjust the After Execute Wait delay in the VPN/SSH/Gateway tab, which is located in the advanced properties of the session. As some servers are slower than others, the delay may be too short, in which case the session would get launched before the SSH server has had time to properly connect.
We truly hope that we’ve helped demystify the SSH Tunnel for you and, in doing so, made your day a little bit better!
As always, please let us know your thoughts by using the comment feature of the blog. You can also visit our forums to get help and submit feature requests, you can find them here.