
A few months ago, PowerShell 7 came out, finally bridging the gap between Windows PowerShell and PowerShell Core. It is now possible to use the same PowerShell everywhere (Windows, macOS, Linux!) while remaining compatible with Windows-specific modules. One of the core differences found in the new PowerShell is the usage of SSH as a secure transport for PowerShell remoting, while the old Windows PowerShell relied on WSMan, a solution with limited interoperability due to its dependency on Windows authentication.
SSH support in Windows was greatly improved by Microsoft back in 2018 when they added an official OpenSSH port to Windows, making SSH a first-class option for terminal-based remoting. This first step made PowerShell remoting over SSH possible, but how does it work under the hood? Today, we are lifting the veil on PowerShell internals and getting PowerShell remoting over SSH to work without SSH. Do not worry, unlike a real magic trick, we will explain how we managed to pull this one!
Setting Up the Demo Environment
To demonstrate how this works, I will be using an Ubuntu virtual machine with the following:
- OpenSSH client (ssh)
- OpenSSH server (sshd)
- PowerShell 7 (pwsh)
- socat tool
- Wireshark
Start by installing most tools with the following ‘apt’ command on Ubuntu:
sudo apt install openssh-client openssh-server socat wireshark
If this is your first time using Wireshark, you probably need to add the current user to the ‘wireshark’ user group, as we will be using it later on in this guide to capture remote PowerShell traffic:
sudo usermod -a -G wireshark $USER
Install PowerShell 7 by following the instructions from the PowerShell github page. At this point, you should have the ‘pwsh’ command available, but we now have to configure the OpenSSH server.
Edit the /etc/ssh/sshd_config file as root (“sudo nano /etc/ssh/sshd_config”), then add the following line:
Subsystem powershell /usr/bin/pwsh -sshs -NoLogo -NoProfile
The location of the ‘pwsh’ executable may differ on your system, but you can find its real location by using the “which pwsh” command and edit the PowerShell subsystem line accordingly. You can then finish by restarting the OpenSSH server to apply the change:
sudo systemctl restart ssh
You can now confirm that SSH works by connecting locally. You will be prompted to accept the SSH server key fingerprint on the first connection:
wayk@pwsh-demo:~$ ssh wayk@localhost wayk@localhost's password: The authenticity of host 'localhost (127.0.0.1)' can't be established. ECDSA key fingerprint is SHA256:U//mO9/28gF1tEkSx/4jDGOmGSnfL+4K6em3L6Ugq18. Are you sure you want to continue connecting (yes/no)? yes Warning: Permanently added 'localhost' (ECDSA) to the list of known hosts. Welcome to Ubuntu 18.04.4 LTS (GNU/Linux 5.3.0-51-generic x86_64)
Now that the “regular” SSH connection works, let’s try PowerShell remoting over SSH:
wayk@pwsh-demo:~$ pwsh PowerShell 7.0.0 Copyright (c) Microsoft Corporation. All rights reserved.
https://aka.ms/powershell Type 'help' to get help.
PS /home/wayk> Enter-PSSession -HostName 'localhost' -UserName 'wayk' wayk@localhost's password: [localhost]: PS /home/wayk>
If the above worked, congratulations, you have just made your first PowerShell remoting session over SSH!
PowerShell Remoting Over SSH Explained
We now have a good test environment to experiment with PowerShell remoting, but we still haven’t really covered how it works. You probably have questions like:
- What’s the difference between a regular SSH connection and PowerShell remoting over SSH?
- Where and how is the OpenSSH client used by the PowerShell Enter-PSSession command?
- What does the “Subsystem powershell” line we added to the sshd_config file do exactly?
- Who are you and what kind of black magic trickery is this? (okay, maybe not that one)
Let’s reveal what happened with the above “Enter-PSSession” command one step at a time, using the following diagram as a reference:
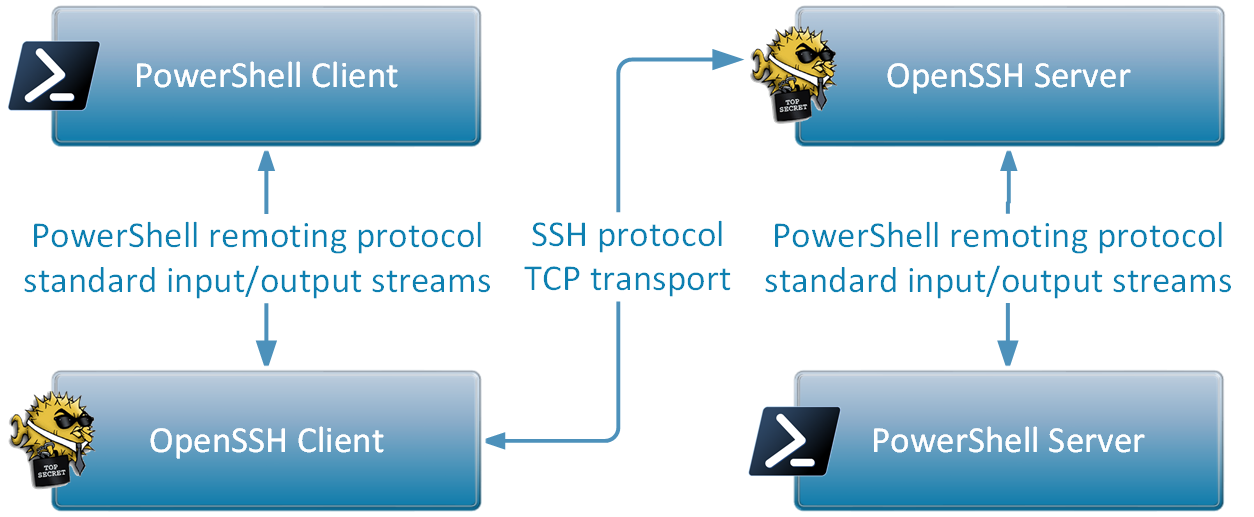
PowerShell Client
The first thing the Enter-PSSession command does is find the OpenSSH client executable (“ssh”), which is the same executable we have called for the regular SSH connection. It then proceeds to construct a command-line based on the -HostName and -UserName parameters we passed and launches “ssh” as a child process:
/usr/bin/ssh -l wayk -s localhost powershell
The last parameter, “powershell”, is not random: it tells the OpenSSH client to use the “powershell” subsystem, which is what we configured earlier in the sshd_config file of the OpenSSH server.
Once the SSH connection is established, the PowerShell client hooks the child process standard input and output streams, and uses it as a PowerShell remoting transport. In other words, the PowerShell client does nothing more than read/write operations with the OpenSSH client child process beyond this point.
OpenSSH Client and Server
The OpenSSH client connects to the OpenSSH server, but instead of requesting a regular system shell like bash, it requests the “powershell” subsystem. The OpenSSH server finds the command-line associated with the “powershell” subsystem in the sshd_config file and creates a child process with it. The OpenSSH server then hooks the child process standard input and output streams and relays all data sent over SSH directly into it. This may look familiar because the same strategy is used on the client side.
PowerShell Server
Let’s go back to the PowerShell subsystem line to take a closer look at it. We already know that this line tells the OpenSSH server what command to execute for SSH clients requesting the “powershell” subsystem, but we don’t know more than that.
Subsystem powershell /usr/bin/pwsh -sshs -NoLogo -NoProfile
The important part in the above command is the “-sshs” option that tells PowerShell to run in “SSH server mode”. If you run the same command in a regular terminal, you won’t see the regular PowerShell prompt, and pressing enter will throw an error:
wayk@pwsh-demo:~$ pwsh -sshs -NoLogo -NoProfile An unknown element "" was received. This can happen if the remote process closed or ended abnormally.
This is because PowerShell in SSH server mode expects to exchange the raw PowerShell remoting protocol (also called MS-PSRP) over its standard input and output streams. You can try typing random text, which will result in another error, because we are not giving the process valid PowerShell remoting messages (specially formatted XML).
However, in the context of PowerShell remoting over SSH, these messages are exchanged between the PowerShell client and PowerShell server, both of which expect and understand the PowerShell remoting protocol. This also means that SSH doesn’t really know about PowerShell: it just requests the “powershell” subsystem by name and the OpenSSH server calls the associated command-line.
Taking SSH out of PowerShell Remoting
Now, let the fun begin! We have covered the basics of setting up PowerShell remoting, we have tried it, and we have briefly covered how it works under the hood with the OpenSSH client and server. We are now going to replace OpenSSH by “socat”, a swiss army knife tool that can relay traffic between different input and output sources. As an added bonus, we will also be using Wireshark to capture the raw PowerShell remoting protocol messages, so we can see what it looks like, not just read about it in a protocol specification. Let’s get started, using the following updated diagram as a reference:
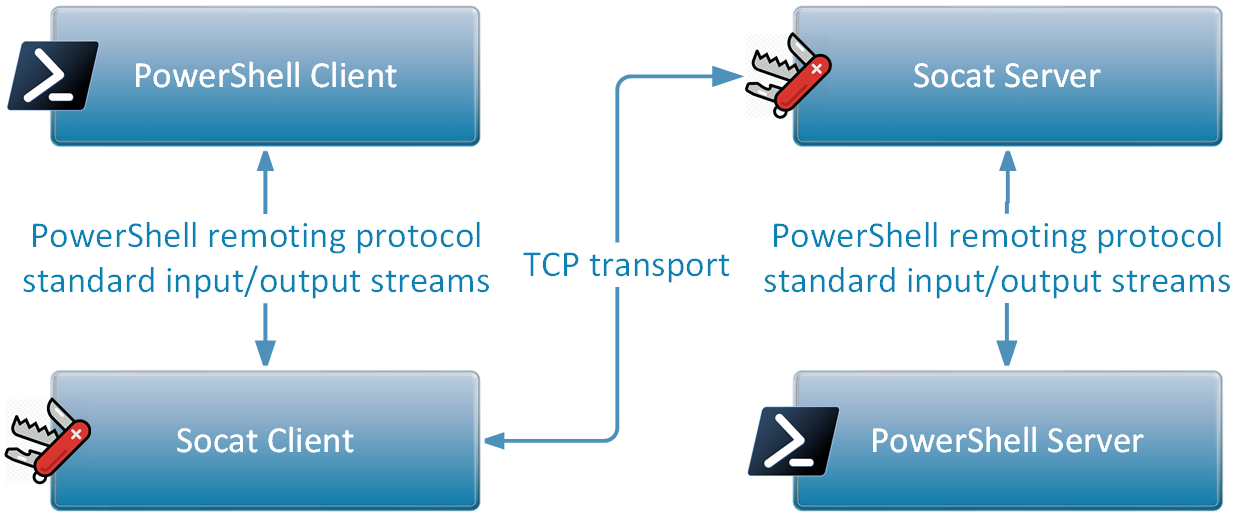
The first step is to prepare a socat server to serve as a replacement for the OpenSSH server. Open a new terminal, and enter the following command:
socat TCP-LISTEN:5001 EXEC:"/usr/bin/pwsh -sshs -NoLogo -NoProfile"
This socat server is simple: it listens in TCP on port 5001 (any port will do) and does the same thing as the OpenSSH server with the “powershell” subsystem command. If we connect to this socat server, the TCP data will be relayed to the child process standard input and output streams directly. Leave this terminal open to keep the socat server running and create a new terminal for the next steps.
The second step is to prepare our socat client and disguise it as our “OpenSSH client” for PowerShell. Earlier in this article, it was said that the first thing the “Enter-PSSession” command does is find the “ssh” executable. Since there is no proper way to force PowerShell to call a different command, we will create our own “ssh” executable script file and then modify the PATH environment variable to force PowerShell to use it.
Create a new text file called “ssh” in your user home (or anywhere you like) and set the following content:
#!/bin/sh socat TCP:localhost:5001 -
This socat client command connects to the socat server in TCP on port 5001 and redirects everything to the process standard input and output streams, which is similar to what the real OpenSSH client does.
Make the script executable, then edit your PATH environment variable:
chmod +x ssh export PATH=/home/wayk:$PATH
Confirm that the fake “ssh” command gets picked up instead of the real one:
which ssh /home/wayk/ssh
Keep this terminal open, as it the one where we will need to launch the PowerShell client from (pwsh) in a moment. Before taking the final step, let’s open Wireshark to capture the traffic that will be exchanged between the socat client and server on the TCP port 5001.
Launch Wireshark, then from the Capture menu, select “Options”. From the list of input sources, select the one called “Loopback: lo” then click “Start”. The capture is now active for the loopback interface (localhost traffic). In the top filter bar, you can enter “tcp.port == 5001” to apply a filter restricted to our socat client and server traffic, and take out the noise from unrelated applications. Leave Wireshark running and go back to the terminal where the PATH environment variable has been modified to pick up our fake ssh client.
Launch PowerShell, then call Enter-PSSession like we did before:
wayk@pwsh-demo:~$ pwsh PowerShell 7.0.0 Copyright (c) Microsoft Corporation. All rights reserved.
https://aka.ms/powershell Type 'help' to get help.
PS /home/wayk> Enter-PSSession -HostName 'localhost' -UserName 'wayk' [localhost]: PS /home/wayk>
Ok, it worked, but it looks just the same, so what is different this time? For starters, you may have noticed that our fake ssh client did not prompt for the password, as our socat-based solution skips authentication entirely. As proof that it worked, we can find our fake ssh client in the list of processes:
wayk@pwsh-demo:~$ ps ax | grep powershell 2286 pts/1 S+ 0:00 /bin/sh /home/wayk/ssh -l wayk -s localhost powershell
You can now go back to Wireshark and stop the capture. If everything worked, you should now see XML-formatted messages! Right-click on one of the messages in the sequence and select “Follow - TCP conversation”. This will open a special conversation view where messages from the client are colored red and messages from the server are colored blue. Not only does this confirm that we’ve managed to remove OpenSSH entirely from the picture, but we now have a very practical way of capturing PowerShell remoting traffic for the purpose of studying it!
Closing Thoughts
I hope you have enjoyed this guide, and that it helped getting a better understanding of how PowerShell remoting over SSH works. There is a lot more to PowerShell remoting than just SSH: in fact, there are special transports such as named pipes and even Hyper-V sockets that are used in PowerShell Direct. By making it easier to experiment with replacing the remoting transport, it might be possible to bring PowerShell to places we never thought possible in the first place, and open the way to new exciting use cases.